2.3.1 Basic theory
Axisymmetric drop shape analysis (ADSATM) is a technique to determine liquid-fluid interfacial tension and contact angle from the shape of axisymmetric menisci, i.e., from sessile drop, captive drop, as well as pendant drops. The strategy employed is to construct an objective function which expresses the deviation of the physically observed curve from a theoretical Young-Laplace curve, i.e., a curve satisfying the Young-Laplace equation of capillarity:
![]() (1.20)
(1.20)
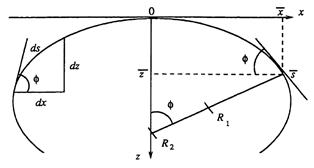
Fig. 1.12 Definition of the coordinate system. R1 and R2 are the two principal radii of curvature of the drop
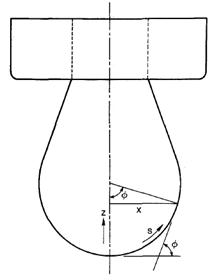
Fig. 1.12 Experimental geometry of pendant drop experiment.
γ is the interfacial tension, R1 and R2 are the two principal radii of curvature, and ΔP is the pressure difference across the curved interface. This is a mechanical equilibrium condition between two fluid phases separated by a curved interface. It represents a balance between two opposing forces: the surface tension of the interface and gravity. While the former tends to make the drop spherical, the latter pulls the drop downward. In the absence of any external forces other than gravity, ΔP may be expressed as a linear function of the elevation:
ΔP =ΔP 0±Δρgz (1.23)
Where ΔP0 is the reference pressure at any arbitrary reference plane, Δρ is the density difference between the fluids, g is the gravitational acceleration (negative for pendant drop and positive for sessile drop) , and z is the vertical height above the reference plane.
If the origin of the coordinate system is placed at the apex point of the drop and the x-axis is tangent to the origin and normal to the axis of symmetry, as shown in Figure 1.12, Eq. (1.23) can then be written as:
![]() (1.24)
(1.24)
As indicated in Figure 1.12, the radius, R1, turns in the plane of the paper, R2 = ![]() rotates in the plane perpendicular to the plane of the paper and about the axis of symmetry and R0 is the radius of curvature at the origin (R 1 = R2 = R0 at the origin); Φ is the turning angle measured between the tangent to the interface at (x, z) and the horizontal plane through the same point (x, z) and represents the contact angle at the point where the liquid touches the solid surface. Since the drop is axisymmetric, the interface can be described by the meridian section done, shown in Figure 1.12. If the interface is given by
rotates in the plane perpendicular to the plane of the paper and about the axis of symmetry and R0 is the radius of curvature at the origin (R 1 = R2 = R0 at the origin); Φ is the turning angle measured between the tangent to the interface at (x, z) and the horizontal plane through the same point (x, z) and represents the contact angle at the point where the liquid touches the solid surface. Since the drop is axisymmetric, the interface can be described by the meridian section done, shown in Figure 1.12. If the interface is given by
f = f (x, z) (1.25)
the meridian curve can be represented by
x= x (s) Z=Z(S) (1.26)
where s is the arc length parameter measured from the origin. The Laplace equation, i.e., Eq. (1.24), is then parameterized and results in a set of three first order differential equations and three boundary conditions as follows:
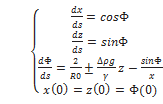 (1.27a) (1.27b)
The equations (1.27) representing drop profiles can be expressed in dimensionless form as where dimensionless reduced variables are defined as X=x![]() , Y=y
, Y=y ![]() , S=s
, S=s ![]() , and B=b
, and B=b ![]() , (b=R0). Eq. (1.26) can be represented as:
, (b=R0). Eq. (1.26) can be represented as:
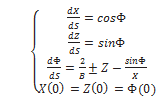 (1.28a) (1.28b)
The dimensionless shape factor is given by
B=b ![]() = R0
= R0![]() 1/2 (1.29)
1/2 (1.29)
And β=B2 is called the Bond number (or shape factor).The shape of an axisymmetric drop, bubble, or meniscus depends only on this one dimensionless parameter. And a= ![]() 1/2 is known as the capillary constant and has units of length. The Bond number is a measure of the relative importance of gravity to surface tension in determining the shape of the drop. For Bond numbers near zero, surface tension dominates and the drop is nearly spherical. For larger Bond numbers, the drop becomes significantly deformed by gravity.
1/2 is known as the capillary constant and has units of length. The Bond number is a measure of the relative importance of gravity to surface tension in determining the shape of the drop. For Bond numbers near zero, surface tension dominates and the drop is nearly spherical. For larger Bond numbers, the drop becomes significantly deformed by gravity.
By simultaneously integrating the system of equations, the theoretical drop profiles are matched with the experimental drop profiles, where the former are calculated with the surface tension as one of the adjustable parameters. The best match identifies the correct, i.e., operative surface tension.
Apart from local gravity and densities of liquid and fluid phases, the only input information required by ADSA is several arbitrary but accurate coordinate points selected from the drop profile. The output of the ADSA program provides the values of surface tension, drop volume, surface area, and in the case of a sessile drop, radius of the three-phase contact line and contact angle.
Mathematically, the integration of the Laplace equation is straightforward only for cylindrical menisci; i.e., menisci for which one of the principal curvatures, 1/R, is zero. For a general irregular meniscus, mathematical analysis would be very difficult. For the special case of axisymmetric drops, numerical procedures have been devised. Fortunately, axial symmetry is not a very significant restriction for most sessile drop and pendant drop systems.
2.3.2 History of drop shape analysis method
Quincke [10] seems to the first to use the sessile drop for surface tension measurements. In 1858, he measured the height of the drop Ze from its top to the equator and calculated surface tension for the drops poorly wetting a solid substrate (θ>90°). Andreas, Hauser and Tucker [11] are considered to the authors of the pendant drop method for measuring interface tension in 1938.They were the first to obtain the value of surface tension with acceptable accuracy.
Generally, we divide method of measuring interfacial tension based on drop shape analysis into three generations.
2.3.2.1 Manual method using table look-up and selected plane method (Bashforth and Adams, Hartland and Hartley, Andreas et al., Paddy)
Most typical characteristics of this generation are manual or with least aid with computer (be restricted to demarcate and find appropriate parameters of equation by known surface tension of liquid) due to the computational conditions were poor. So all attempts are all closed to mathematics of the calculus of profile of drop and select proper plane to reduce calculation amount and enhance the accuracy.
The earliest efforts in the analysis of axisymmetric drops were those of Bashforth and Adams [12]. They generated sessile drop profiles for different values of surface tension and radius of curvature at the apex of the drop. This was long before digital computers appeared and their work required tremendous labor. Hence, the task of determining interfacial tension and contact angle from the actual profile became a matter of interpolation from their tables, which contained the solutions of the differential equations describing the profile. Blaisdell [13] and Parvatikar and Tawde [14] extended Bashforth and Adams tables, and Fordham [15] and Mills [16] generated equivalent tables for pendant drops (see Ref. [17]).
Hartland and Hartley [18] collected numerous solutions for determining the interfacial tensions of axisymmetric fluid–liquid interfaces of different shapes. A FORTRAN computer program was used to integrate the appropriate form of the Laplace equation and the results were presented in tabulated form. However, the major source of errors in their methods is related to data acquisition. The description of the whole surface of the drop is reduced to the measurement of a few preselected critical points, which are compatible with the tables used. These points are critical since they correspond to special characteristics, such as inflection points on the interface, and they must be determined with high accuracy. Also, the use of these tables is limited to drops of a certain size and shape range.
Malcolm and Paynter [19] proposed another method for the determination of contact angle and surface tension from sessile drop systems. However, as with some of the previous approaches, the data points are specific geometric points on the drop interface and the method is also limited to sessile drops with contact angle greater than 90°.
Maze and Burnet [20,21] developed a more satisfactory scheme for the determination of interfacial tensions from the shape of sessile drops. They developed a numerical algorithm consisting of a nonlinear regression procedure in which a calculated drop shape is fitted to a number of arbitrarily selected and measured coordinate points on the drop profile, by varying two parameters until a best fit is obtained. In other words, the measured drop shape (one-half of the meridian section) is described by a set of coordinate points and no particular significance is assigned to any of the points. In order to start the calculation, reasonable estimates of the drop shape and size are required; otherwise the calculated curve will not converge to the measured one. The initial estimates are obtained, indirectly, using values from the tables of Bashforth and Adams [12]. Despite the progress in strategy, there are several deficiencies in this algorithm. The error function, i.e., the difference between the theoretical drop profile and the experimental drop profile, is computed by summing the squares of the horizontal distance between the theoretical drop profile and the experimental profile. This computation is not particularly suitable for sessile drops whose shapes are strongly influenced by gravity. For instance, large drops of low surface tensions tend to flatten near the apex. Therefore, any data point near the apex may cause a large error, even if it lies very close to the best-fitting curve, and lead to considerable bias of the solution. Also, the identification of the apex of the drop is of paramount importance since it acts as the origin of the calculated curves. Huh and Reed [22] developed a similar approach but they used a poor approximation of the normal distance to define the objective function [23] and the apex point must still be predetermined by the user. Also, their method is applicable only to sessile drops with contact angles greater than 90°.
For pendant drop method, attempt of calculating surface tension begins from Andreas, Hauser and Tucker [11] in 1938. In their work, pendant drop with equators were used, and equatorial diameters 2xe and diameter 2x(m) at the distance mxe (m=2) from the top of drop. Later, Misak [24] , Winkel [25] and J.F.Princz [26] etc. obtained a different set of approximation formulae each of which works well in the respective range. The difference between all of this selected plane method is only the way of select and which plane to be selected.
2.3.2.2 Automatic measurement using digital image processing based selected planed (Hensen, H.H.J.Girault, Song.B )
Most typical characteristics of this generation are using digital image processing to evaluate the discrepancy between the theoretical Young-Laplace curve and the actual drop profile with estimated bond number (Based on select plane method or similar approach). Most obvious drawbacks of these approaches are other operator should measure the surface tension of contact angle under same condition that the approximation formulae established.
H.H.J.Girault et al [27] may be the first one whose adopt the image processing for drop shape analysis. In 1984, they proposed a video image profile digitizer for analyze interfacial tension. A video image processor designed for the automatic digital measurement of the external coordinates of drop shape. They utilizes the Laplace equation at the inflexion plane of the drop located by a polynomial fitting technique. In 1986, S.H.Anastasiadis et al [28] also used video image processing. In their work, the entire algorithm for drop profile acquisition and analysis is executable on a computer and includes a facility for rotationally resistant smoothing of the drop profile. The first estimate of dimensionless shape parameter B0 is from the approximate relation:
B0=exp[-6.70905+15.3002W-16.44709W2+9,92425W3-2.58503W4] (1.30)
Where W is the ratio of the local drop diameter (using select plane of Andreas)
The most famous technique during this generation developed by F.K.Hansen.[29][30].In order to differentiate the drop profile, a filter routine using a local threshold and interpolation technique has been developed that is combined with an edge-tracing algorithm. The program for calculation of surface tension is divided into two parts. The first part is based on the traditional optical method and uses inflection of the drop profile. By means of several polynomial interpolations and curve fitting of theoretical profiles, the form factor β and surface tensionγ are determined. The second part of the calculation utilizes the above values as a first estimate and then performs a further optimization of γ by comparison between experimental and theoretical Young-Laplace profiles. He used selected plane basedon Ds/De- method from Fordham [31], but the equation is differing from Anastasiadis’s. Most commercial instrument employed his technique.
Another technique that used in commercial instrument is developed by Song.B and J.Springer [32]. The factors that affect the available accuracy of the method have been analyzed using theoretical simulations. It was found that the tilt of the drop profiles may lead to large errors in the resultant IFT values if the tilt was not corrected before or during the optimization procedure. This effect could be reduced drastically if a profile was averaged between its two sides and the mean profile was used for optimization. The aspect ratio of a drop image (or profile) can be determined reliably by considering it one of the parameters to be optimized. In their work, the first estimate of dimensionless shape parameter B is from the different to all other approach. They used included angle between baseline and line connected with one of three selected points (30°,45,60°) and apex. (See fig. 1.13.) So in this method, if angle is small than 30°, the calculating may failure. The most advantage of this method is its calculating speed is very fast, be said about less than 1S.
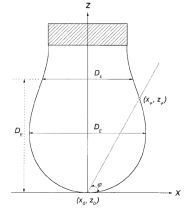
Fig. 1.13 Selected-plane of Song.B method
Anastasiadis et al. [33] proposed another technique that couples digital image processing with robust shape comparison routines [34]. In general, it is recognized that “outliers”, which are erroneous data points of an experimental drop profile, have a large impact on the results of the least squares method. Instead of comparing individual points on the two curves (as it is compared in the least square method), the robust shape comparison routines compare vectors or line segments on the experimental profile with the corresponding vectors on the theoretical profile. Anastasiais et al. claimed that their technique requires considerably less computer power and that it is intrinsically resistant to the presence of outliers. The major problem in their technique is that it requires the specification of a reference point on the profile to which the position of all other points on the profile is related. The reference point can be either the drop apex or the “center” of the drop, defined as the intersection of the vertical axis of symmetry and the horizontal maximum diameter. Thus, the accuracy of the results depends not only on the accuracy of the drop profile coordinates but also on the accuracy of the determination of the reference point [35,36].
In recent years, development of drop shape analysis method is not so much. Some technique[37][38] is available for Low-bond drop analysis and the automation degree is not high.
2.3.2.3 ADSA (A.W.Neumann)
Rotenberg et al. [39] developed a more powerful technique, Axisymmetric Drop Shape Analysis (ADSA), which fits the measured profile to a Young-Laplace curve using a nonlinear procedure. ADSA slightly predates the work of Anastasiadis et al. In ADSA, the objective function, which is used to evaluate the discrepancy between the theoretical Young-Laplace curve and the actual profile, is the sum of the squares of the normal distances between the measured points (i.e. experimental curve) and the calculated curve. In addition, the location of the apex of the drop is assumed to be unknown and the coordinates of the origin are considered as independent variables of the objective function. Thus, the drop shape can be measured from any convenient frame. ADSA uses the Newton–Raphson method in conjunction with incremental loading to minimize the objective function. This numerical procedure unifies both the methods of the sessile and pendant drops. No table is required, nor is there any restriction on its applicability.
The simplicity and accuracy of the ADSA method was further improved as Cheng [35,40] implemented automatic image processing techniques to detect the edge of the drop. He incorporated an automated edge detection technique into the ADSA program that improved the accuracy of the results considerably as well as the efficiency of the “first generation” of the ADSA technique (i.e. Rotenberg ADSA).
Cheng et al. [35,40,41] evaluated the performance of the first generation of ADSA for both pendant and sessile configurations using synthetic drops. The randomness of the data as input to ADSA was evaluated. The points at five different locations of the profile were individually perturbed to test the influence of each location of the results. It was found that data points near the neck of a pendant drop or near the liquid–solid interface for a sessile drop have more impact on the results than points from other locations. This first generation of ADSA was found to give very accurate results except for very large and flat sessile drops, where the program failed. In addition, it was difficult to achieve perfect alignment of the camera with a plumb line; there are errors associated with the coordinates of the plumb lines defined manually on the screen of the computer using a mouse.
Finally, del Río [42,36,43] developed a second generation of ADSA to overcome the deficiencies of the numerical schemes of the first generation using more efficient algorithms. He used the curvature at the apex rather than the radius of curvature and the angle of vertical alignment as optimization parameters. He also developed a new program called Axisymmetric Liquid–Fluid Interface (ALFI) that performs in an opposite manner to ADSA. It generates theoretical Young-Laplace curves by integrating the Laplace equation for known values of surface tension and curvature at the apex, i.e. it essentially automates the procedure of Bashforth and Adams.
The determination of interfacial properties using both ADSA algorithms is carried out in the following three steps:
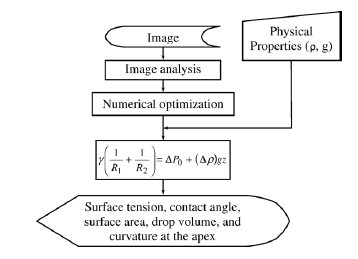
Fig. 1.13 General procedure of Axisymmetric Drop Shape Analysis (ADSA).
- Image acquisition
The image of a pendant or sessile drop is obtained using the experimental setup of ADSA. Basically, the drop is illuminated from behind with a blue light source. A microscope and a CCD camera are used to obtain a magnified image of the drop. The digitized image contains the image data in the form of digital picture elements or pixels. The value of each pixel is called the intensity or grey level (in the black-and-white case). The most commonly used equipment utilizes such as 640×480 pixels and 256 grey levels to represent an image where 0 and 255 represent black and white, respectively. Thus, a digitized image is mathematically represented by an array of real numbers from 0 to 255. Once an image of the drop is obtained and stored in the memory, the software of ADSA is used to perform the image analysis process and numerical optimization to detect the experimental profile and calculate interfacial properties of the drop, respectively.
- Drop profile detection
The first part of the software is the image processing technique that detects the edge of the drop automatically. The edge is found by applying the Sobel or Canny edge operator with a 3×3 convolution mask. Basically, the image is divided into small areas which are 3×3 pixel in size. Then, a best least-squares plane is fitted through 9 grey-level pixels of the 3×3 array, and the slope of this plane in the x and y directions is calculated. From these two directional gradients, the overall gradient of this plane is calculated. This procedure is then repeated for the whole digitized image such that each pixel point is the central point of the 3×3 array. In this fashion, a grey-level gradient for each pixel point of the whole image is determined, leading to a gradient image. The drop profile is established by searching for the pixels with maximum gradient along the drop profile. In other words, the drop profile is approximated by the pixel of the steepest grey-level gradient, moving from the outside of the drop image to the inside, through the boundary.
- Numerical optimization
The main part of the numerical scheme of ADSA is the optimization process that fits a series of Young-Laplace curves (theoretical curves) to the experimental profile. Prior to the fitting process, theoretical curves are generated by integrating the Laplace equation of capillarity (Eq. (1.20)) for the given values of surface tension and curvature at the apex of the drop.
After generating the theoretical curve for given values of b and c, the deviation of the experimental profile from the Young-Laplace profile is determined. Experimental profile points Ui, i=1, 2, …, N, obtained from image analysis techniques, are compared with u=u(s), a calculated Young-Laplace curve, by computing the normal distance, di, between Ui and u. The “error” for the i-th point is computed as the square of the minimum distance di
![]() (1.31)
(1.31)
where (Xi, Zi) is an experimental point, and (xi, zi) is the point on the Young-Laplace curve closest to it. Then, an objective function, E, is defined as the sum of the individual errors. The value of the objective function, E, is a function of a set of parameters, q, with elements qk, k=1, ⋯, M. The goal of this analysis is to calculate the values of qk that minimize E, i.e., to find the parameter set q that gives the best fit between the measured points and a Young-Laplace curve. Another difference between the numerical schemes of the two generations of ADSA is in the number of the optimization parameters (i.e. qk). The first generation of ADSA uses four optimization variables, i.e. 1/b, c/b2, x0 and z0 (x0 and z0 are the coordinates of the apex). However, del Río uses five optimization parameters, i.e. b, c, x0, z0 and α (the angle of the vertical alignment). The objective function E will assume a single absolute minimum value at one point in the M-dimensional space of E. Thus, the necessary conditions for an extremum in the value of E are
![]() (1.32)
(1.32)
The above equations forma set of nonlinear algebraic equations in the variables qk, k=, ⋯, M. In order to solve for these variables, an iterative solution is required. The two generations of ADSA use the Newton–Raphsonmethod as a numerical solver. However, the first generation uses the Newton–Raphson in conjunction with incremental loading; the second generation uses a combination of the Levenberg–Marquardt method and Newton– Raphson. The outputs of the numerical solvers are the optimization parameters that give the best fit between the measured points and a Young-Laplace curve. Surface tension is calculated based on the value of c (i.e. one of the optimization parameters), Δρ and g (Eq. (8)). Other interfacial properties, such as contact angle, drop volume and surface area, are obtained from the selected Young-Laplace curve.
The advantages of pendant and sessile drop methods are numerous. In comparison with a method such as the Wilhelmy plate technique, only small amounts of the liquid are required. Drop shape methods easily facilitate the study of both liquid-vapor and liquid-liquid interfacial tensions. Also, the methods have been applied to materials ranging from organic liquids to molten metals and from pure solvents to concentrated solutions. There is no limitation to the magnitude of surface or interfacial tension that can be measured: The methodology to be presented here works at calculating 103 mN/m as well as at 103 mN/m. Measurements have been satisfactorily made over a range of temperatures and pressures. In addition, since the profile of the drop may be recorded by photographs or digital image representation, it is possible to study interfacial tensions in dynamic systems, where the properties are time-dependent.
Hot keywords of USA KINO:contact angle, contact angle measurement, contact angle meter, contact angle goniometer, surface tensiometer, interfacial tensiometer, surface tension measurement, surface tension, surface tensiometry, contact angle measurement equipment and device, calculating surfac free energy, Determining Critical Micelle Concentration (CMC) of surfactant, made in China Method for choosing surface tensiometer NEW Method for choosing contact angle meter (goniometer) NEW Method for choosing interfacial tension meter NEW

Manage technical support: www.chem17.com GoogleSitemap
MainPro : contact angle,contact angle meter,contact angle goniometer,surface tension,surface tensiometer